
Volvo Amazon Speedometer Facia Restoration


Back in May last year I started a process of refurbishing the speedometer unit from my Amazon. The speedometer itself was working fine, it was simply a matter of appearance; just like probably every other Volvo Amazon out there, the grey crackle coating on the facia had deteriorated and was peeling off. Many owners remove the coating completely and simply leave the brass finish, but quite frankly I don't like this look. I took the plunge and experimented with disassembling the binnacle (details in this earlier post). I can now report that I have finished the task.

The first challenge prior to painting the was what to do about the plastic warning lamp lenses (high beam, indicators, oil pressure and charge/amps). I wanted to remove them as I thought they would be difficult to mask effectively. 

They are fixed originally by being melted from the back. They also each have a rubber shroud which being 50+ years old and subjected to heat cycles from the lamps, are somewhat discoloured and cracked. I don't think that there is a hope in hell of new/replacement ones being available, so it is important to salvage these. Although not glued to the facia, two had stuck to it. 

I didn't want to just pull at them as they would quite probably split. Instead, I applied a small dab of acetone with a brush and gradually eased them off.

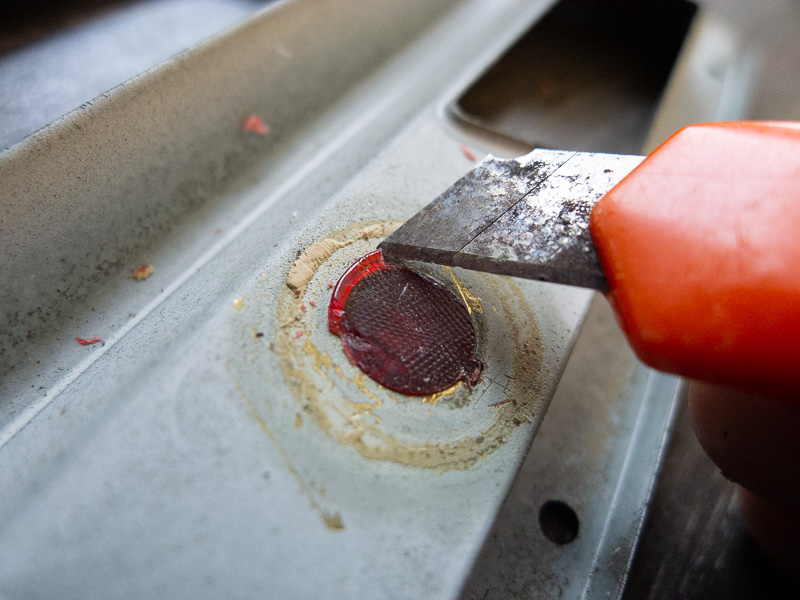
I then used a craft knife to carefully remove the melted edges of the plastic lens, as little off as possible to allow the lens to be pressed through. If you are trying this yourself, be patient and nibble away gently.

With all the shrouds and lenses removed, the facial was prepared for paint by scouring with an emery cloth and a wipe over with panel wipe.


The paint that I selected is 'VHT Wrinkle Plus'. This is a heat resistant paint designed for rocker covers and other under-bonnet items, as well as dashboards.

I watched a few YouTube reviews and demonstrations, then I gave it a try. I followed the recommended method: a light mist coat, then a thick coat working horizontally, followed by a vertical coat and then a final pass laying the paint down diagonally.

In order to achieve the crackle finish, heat is required. The manufacturer's instructions recommend baking in an oven, but as others have suggested I simply used a heat gun. As the heat is applied and the paint begins to cure, the crackle effect can clearly be seen. The piece then needs to be left for at least 24 hours to completely cure/harden.

A couple of days later,  I reassembled the speedometer. My original plan was to superglue the lenses to the facia piece, but I found that there was sufficient excess of plastic remaining to allow me to 're-melt' the plastic rim, using a soldering iron. I was also able to use the same technique to reattach the facia to the perspex.


I gave the binnacle a thorough but gentle clean using a soft paint brush before completing the reassembly...


...and here is the result.

I must say that I am extremely impressed with this outcome. The crackle finish looks a very close approximation of the original factory finish and although it might not be the exact same shade, I suspect that only a direct side by side comparison would reveal any difference. This refurbishment process is a little fiddly, requiring patience and finesse. If you are considering a similar makeover on your Volvo speedometer, it would of course involve removing it from the dash which you might consider too much trouble. But if it's already out, go for it.


< previous post              next post >


Comments

Popular posts from this blog

Removing the Headliner - Volvo 120

Removing the headliner in my Volvo 120 is a job that I have been meaning to tackle for a while and with an enforced hiatus in the boot floor fabrications (awaiting delivery of a sheet of 19 gauge steel),  today seemed as good a time as any. My plan was to try and rescue it.  It is not that I think it is in the best condition, obvious it has discoloured, but it isn't ripped. It is an item that I think I might need to have in the car to meet the 'road going saloon' class spec, but not something that I am particularly bothered about aesthetically. At £100 for a new headliner, I though it might be worth go at saving. However the Volvo service/workshop manual suggests that is not the norm, simply instructing to cut away the old lining. After removal of sun visors, grab handles and the interior light, I started on the headliner at the rear of the car. I had already removed the parcel shelf trim some time ago and so the lower corners were already revealed. There is a small fibre ...

Boot (Trunk) Excavation

As I suspect you are aware, issues with rot in the boot (trunk) of the Volvo 120 series are common and my Amazon is no exception. Over the years it has been 'repaired' a number of times and not always sympathetically. I have made a start removing the filler and the patchwork of metal plates that make up the n/s and the floor next to the spare wheel well.  I've ground off some of the welds, chiselled and bent back the non-original metal.  As I have already reported the lower rear quarter replacement panels are definitely not correctly positioned but I have successfully managed to uncover the original boot floor which although is in a very poor condition, does give me some points of reference for the rebuild. Incidentally, a word of warning. I had to remove a lot of seam sealer and I really should have been wearing gloves. A slip with the scraper brought the session to a rapid conclusion. I was lucky not to end up in A&E. Now that I have investigated more tho...

Progress Report: Rear Window Removal and More

It has been a while since my last post, but I haven't been entirely idle. After my initial investigations into the state of the boot floor (see previous post)  I have removed more from the car in preparation for repairs, including the rear window. This was the last piece of glass still fitted to the car and I was concerned about damage from grinding sparks.  The stainless trim that surrounds the glass is extremely delicate and really expensive to replace, so needs to be removed and stored carefully. I used a couple of old plastic spatulas and they seemed to work pretty well although in hindsight, I think it might have been worth investing in some proper trim removal tools.  One important thing to note is that the chrome finishers that sit on the C pillars are actually held in place with bolts, so if you are attempting this yourself,  do not try and prise them off!  They will break! Instead, you will need to get at the retaining nuts from inside the car by ...